

Welcome to our complete guide to iPhone security, where you’ll find essential tips to protect the sensitive data on your phone from the prying eyes of snoops and hackers.
While Apple’s iOS system is pretty secure, there are ways to make sure that your iPhone is as secure from hackers as it can be. If you have concerns about the safety of your private data, sensitive information including website logins, email addresses, text messages and even photos and videos, we have tips to help.
We have also updated this article with details of the new security and privacy features in iOS 13. Read on to find out why you should update if you haven’t yet.
For related advice, see Do iPhones get viruses?, How Lockdown will protect your iPhone and How to remove a virus from an iPhone or iPad.
Keep iOS up to date
Make sure you’re always running the most recent iteration of iOS, including smaller ‘dot’ or point updates.
This is wise because hackers occasionally find flaws in Apple’s coding which they can exploit, potentially giving them access to your personal data. iOS updates are Apple’s way of combatting the exploits by patching holes and implementing better stability enhancements.
For example, back in January 2019 Apple issued a security update that addressed vulnerabilities that could lead to iPhones and iPad being hacked.
To update to the latest version of iOS, open the Settings app and tap General > Software Update. You’ll either be assured that you’re already running the latest version, or prompted to download and install something newer.
The latest version of iOS at the time of writing is iOS 14, with Apple having rushed out multiple point updates to fix the issues and security flaw over the months that followed the launch, including Apple closes zero-day attack hole on iPhones that was being exploited.
Back in iOS 13 Apple had to address a bug in iOS made an iPhone hack possible.
Expect further updates to be released regularly: it’s important to keep an eye out.
Activate Find My

Another step you can take in the war against hackers attacking your iPhone is to activate Find My iPhone.
Find My iPhone is handy because, if you lose your device, you can log on to Find My iPhone from another Apple device (or via the web on a Mac or PC) and locate your iPhone – or, more importantly, remotely wipe your personal data from the lost phone. This means that even if the hacker does manage to gain access to your lost/stolen device, they’ll find no valuable data.
To turn on Find My iPhone follow these steps:
- Open Settings and tap your name/picture at the top of the screen.
- Next tap iCloud.
- Scroll down and tap Find My iPhone. Tap on that.
- Now make sure the toggle by Find My iPhone is green.
There’s a new feature in iOS 13 that makes it possible for your iPhone to reveal its location to you even if it is offline. This is possible because your iPhone’s Bluetooth signal can be detected by Bluetooth beacons and relayed back to you, even if it isn’t connected to Wi-Fi or a mobile network.
Enable Offline Finding if you want your iPhone to be discoverable in this way – it’s a good idea to as it will make it possible to locate – and crucially – wipe your iPhone if it falls into the wrong hands.
To remotely wipe an iPhone once located with Find My iPhone, follow these steps:
- Log in to the Find My app (or iCloud website).
- Tap on Devices.
- Select your iPhone.
- Tap Erase iPhone and confirm the action.
- The next time it has an internet connection (if it doesn’t already) it’ll automatically wipe itself.
Create a longer passcode

You may have heard of a hacking tool called GrayKey that was being used to crack iPhone and iPad passwords. It’s understood that the tool was being used by law-enforcement agencies, and could crack a four-digit passcode in a couple of hours. A six-digit code can be cracked in a few days.
The device, which needed to be plugged into a iOS device, could disable the usual delays and locks (one minute after six incorrect guesses, five minutes after seven and so on) that would normally stop anyone from brute-forcing their way past a passcode.
While you probably don’t have any reason to not want the police or government agencies to hack into your phone, the real concern here was that if it’s possible for the GrayKey device to hack into your phone this way, it’s highly likely that there will be similar devices and hacks available to criminals.
Luckily Apple blocked the GrayKey tech back in iOS 12, however, should such a thing become possible again – and it’s sure to – here’s what you should do to protect your phone:
- Choose a long passcode: one that’s longer than six digits. It could take a few months to hack an eight-digit pin, and a ten-digit pin could take a decade to crack!
- Use a passphrase containing words, rather than numbers. But use random words that wouldn’t normally appear together.
While passcodes only use numbers 0-9, a passphrase includes numbers, letters, symbols and case-sensitivity which should make your iPhone a lot harder to break into – although it may take a little longer to unlock your iPhone when you want to use it.
You might be thinking that your phone is secured by Face ID or your fingerprint, but remember your phone can still be unlocked with your passcode, so if that’s 0000 you have a reason to be worried!
How to set up a new passcode for iOS
- Open Settings.
- Tap Touch ID & Passcode (or Face ID & Passcode if you have an X-series iPhone).
- Enter your Passcode.
- Tap on Change Passcode.
- Enter your Passcode.
- Tap Passcode Options.
- From the options, choose either Custom Numeric Code or Custom Alphanumeric Code.
- Enter your new code and verify it.
If you use Touch ID or Face ID to unlock your phone you won’t normally need to use your passcode to unlock it, but there are exceptions: the passcode will be required when you haven’t used your phone for more than six days, for instance, or when you restart your device.
(On the subject of passwords, you can significantly improve your security by using a password manager.)
Auto-wipe iPhone content

Our next suggestion may sound a little unnerving, but it’s a great option if you’re worried about people trying to guess your passcode. The idea is that after 10 incorrect guesses, the iPhone will automatically wipe all content and thus make the smartphone useless to the hacker (or at least put your personal.
It’s slightly worrying as we’ve known people to accidentally activate the feature (usually when under the influence of alcohol!) and delete all their personal information. These are usually the same people who tend not to back up regularly… so if you do enable the option we’d advise also turning on automatic iCloud backup so if your data is wiped (due to an accident or someone trying to hack you) you’ll have everything saved in the cloud.
To enable the nuclear option, simply head to Settings > Touch ID & Passcode (or Face ID & Passcode), enter your passcode, scroll to the bottom of the page and toggle on Erase Data.
Avoid opening unknown links

This one is fairly self-explanatory – if you receive an unknown link via text, email or randomly on the web, don’t click on it. This could potentially pose a threat to your device and even though it may not be able to hack your iPhone directly; some pose as popular email clients like Gmail to gain access to your email account.
The pages usually look pretty close to the real thing, so this type of scam is fairly common and it always pays to keep your wits about you.
The general rule is that if you don’t trust the look of the email/message then just don’t bother opening it. The same goes for email attachments too, although there aren’t many cases (if there are any) where hackers have been able to gain access to an iPhone via this method, and this is more of a general tip.
Revoke app permissions

The next step to take in the war against hackers is to revoke access to apps. When you use iOS apps you’ll often be prompted to allow the app to access things like the camera, microphone, contacts, etc to use the app to the fullest extent.
In iOS 13 Apple has made it even harder for apps to gather information about you without your knowledge with a number of additional measures including:
- More choices when it comes to sharing your location – you can choose between: Allow continuous location access while you’re using app, Allow once and Don’t allow.
- You’ll also see a Location Reminder Alert with a map showing you what data the app has been collecting and an explanation of why the app needs that data.
- Apps also require your permission to use Bluetooth in iOS 13. You might wonder just why an app is requesting to use Bluetooth now you have updated to iOS 13. It might be tracking you using Bluetooth beacons in shops and other locations. If you’d rather it wasn’t you can stop this tracking on a per-app basis.
- Same goes for WiFi tracking – apps could track your location by looking for WiFi networks you’d logged onto. This tracking is now off by default in iOS 13.
- Also off by default in iOS 13 is the ability of apps to see the information stored in the notes section of your contacts.
- And in iOS 13 VoIP apps can no longer collect your data in the background – apparently WhatsApp and Snapchat may require changes to comply.
Those are plenty of good reasons to install iOS 13 on your iPhone.
Even though allowing access means you can use every feature of the app, the app may also be able to access your private information.
Don’t get us wrong – this is against Apple’s privacy policy and any apps found collecting personally identifiable information will be removed, and as far as we know this hasn’t happened so far, but it is a possibility.
Either way, if you feel like you’ve installed a less-than-reputable app on your iPhone, you can either delete it or head to Settings > Privacy, select the permission you’d like to revoke and toggle the application off – sadly this has to be done on a per-permission basis as there’s no way to toggle permissions off all at once.
Don’t share location data in images
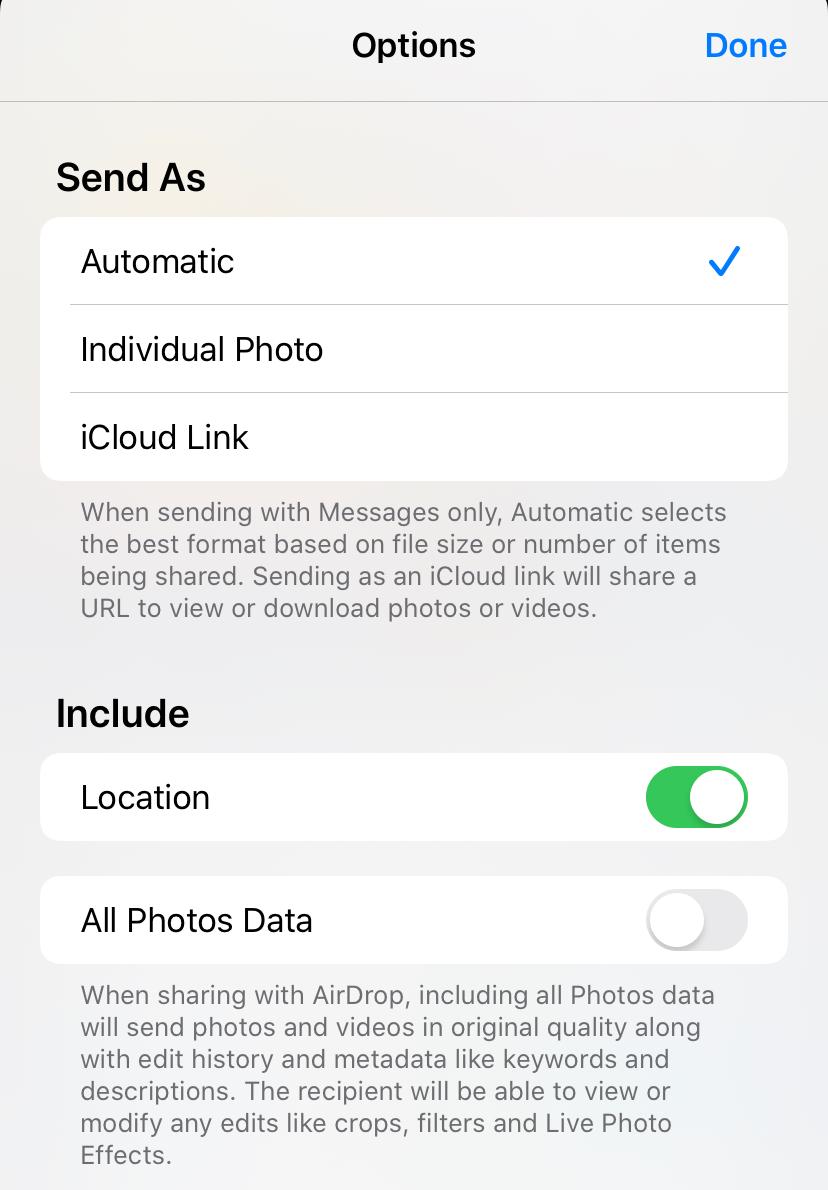
Another way your data can be leaked is in a photo which includes metadata revealing the location in which it was taken.
You can choose not to share this image location data in iOS 13.
You’ll see this option when you attempt to share an image.
- With an image selected for sharing, tap on Options, beside Location Included at the top of the screen.
- If you don’t want to include location data deselect the button beside Location.
How to avoid iCloud photo leaks & hacks

Speaking of photos, you may recall, a few years ago there was a swathe of celebrity photo leaks. As usual on the web, famous women get the worst treatment – which in this case meant the widespread posting of nude photos. And in a lot of cases an iPhone, or an iCloud account, was involved.
That doesn’t mean that Apple hardware and software services are fundamentally insecure. In fact, we feel confident in saying that the iPhone is the most secure mainstream smartphone on the market right now. But it does show that nobody can be complacent about the security of their most personal data and photos.
There are various ways to ensure that your intimate photos aren’t stolen and posted online by hackers: two-step authentication and an audit of your secure questions are both a good idea. But we look at this in far more detail in this article: How to keep your iPhone photos safe.
Turn off Siri
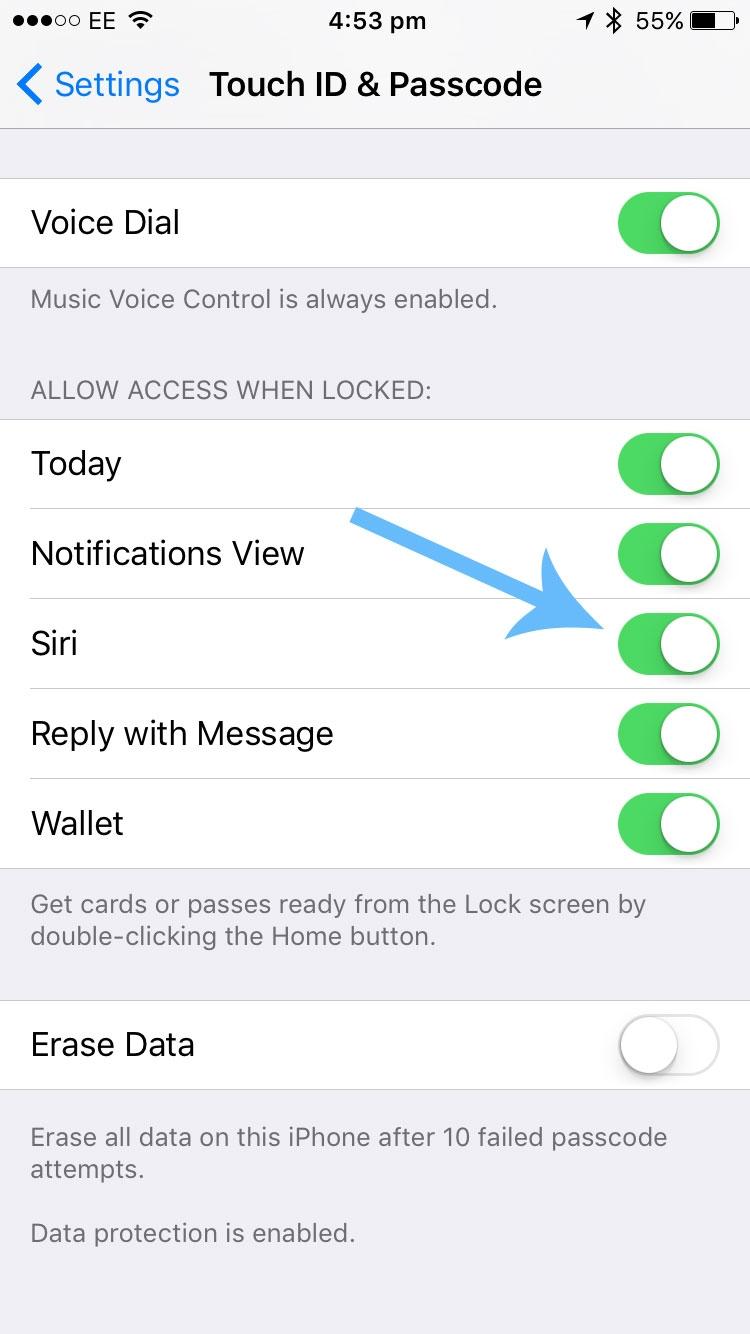
Apple’s personal assistant, Siri, is a great feature of iOS and provides users with a way of using their smartphone hands-free.
However, no matter how helpful Siri may be to users, it can also provide hackers with personal data. Siri will often ask for some kind of verification before allowing access to contacts, photos and other types of sensitive information, but there have been multiple occasions where people have found workarounds completely bypassing the iPhone passcode and providing easy access to the device.
To disable access to Siri on the lock screen, simply head to Settings > Touch ID & Passcode (or Face ID & Passcode) and toggle the “allow access when locked” option off.
Read more advice in our Siri troubleshooting guide.
Turn off auto-fill
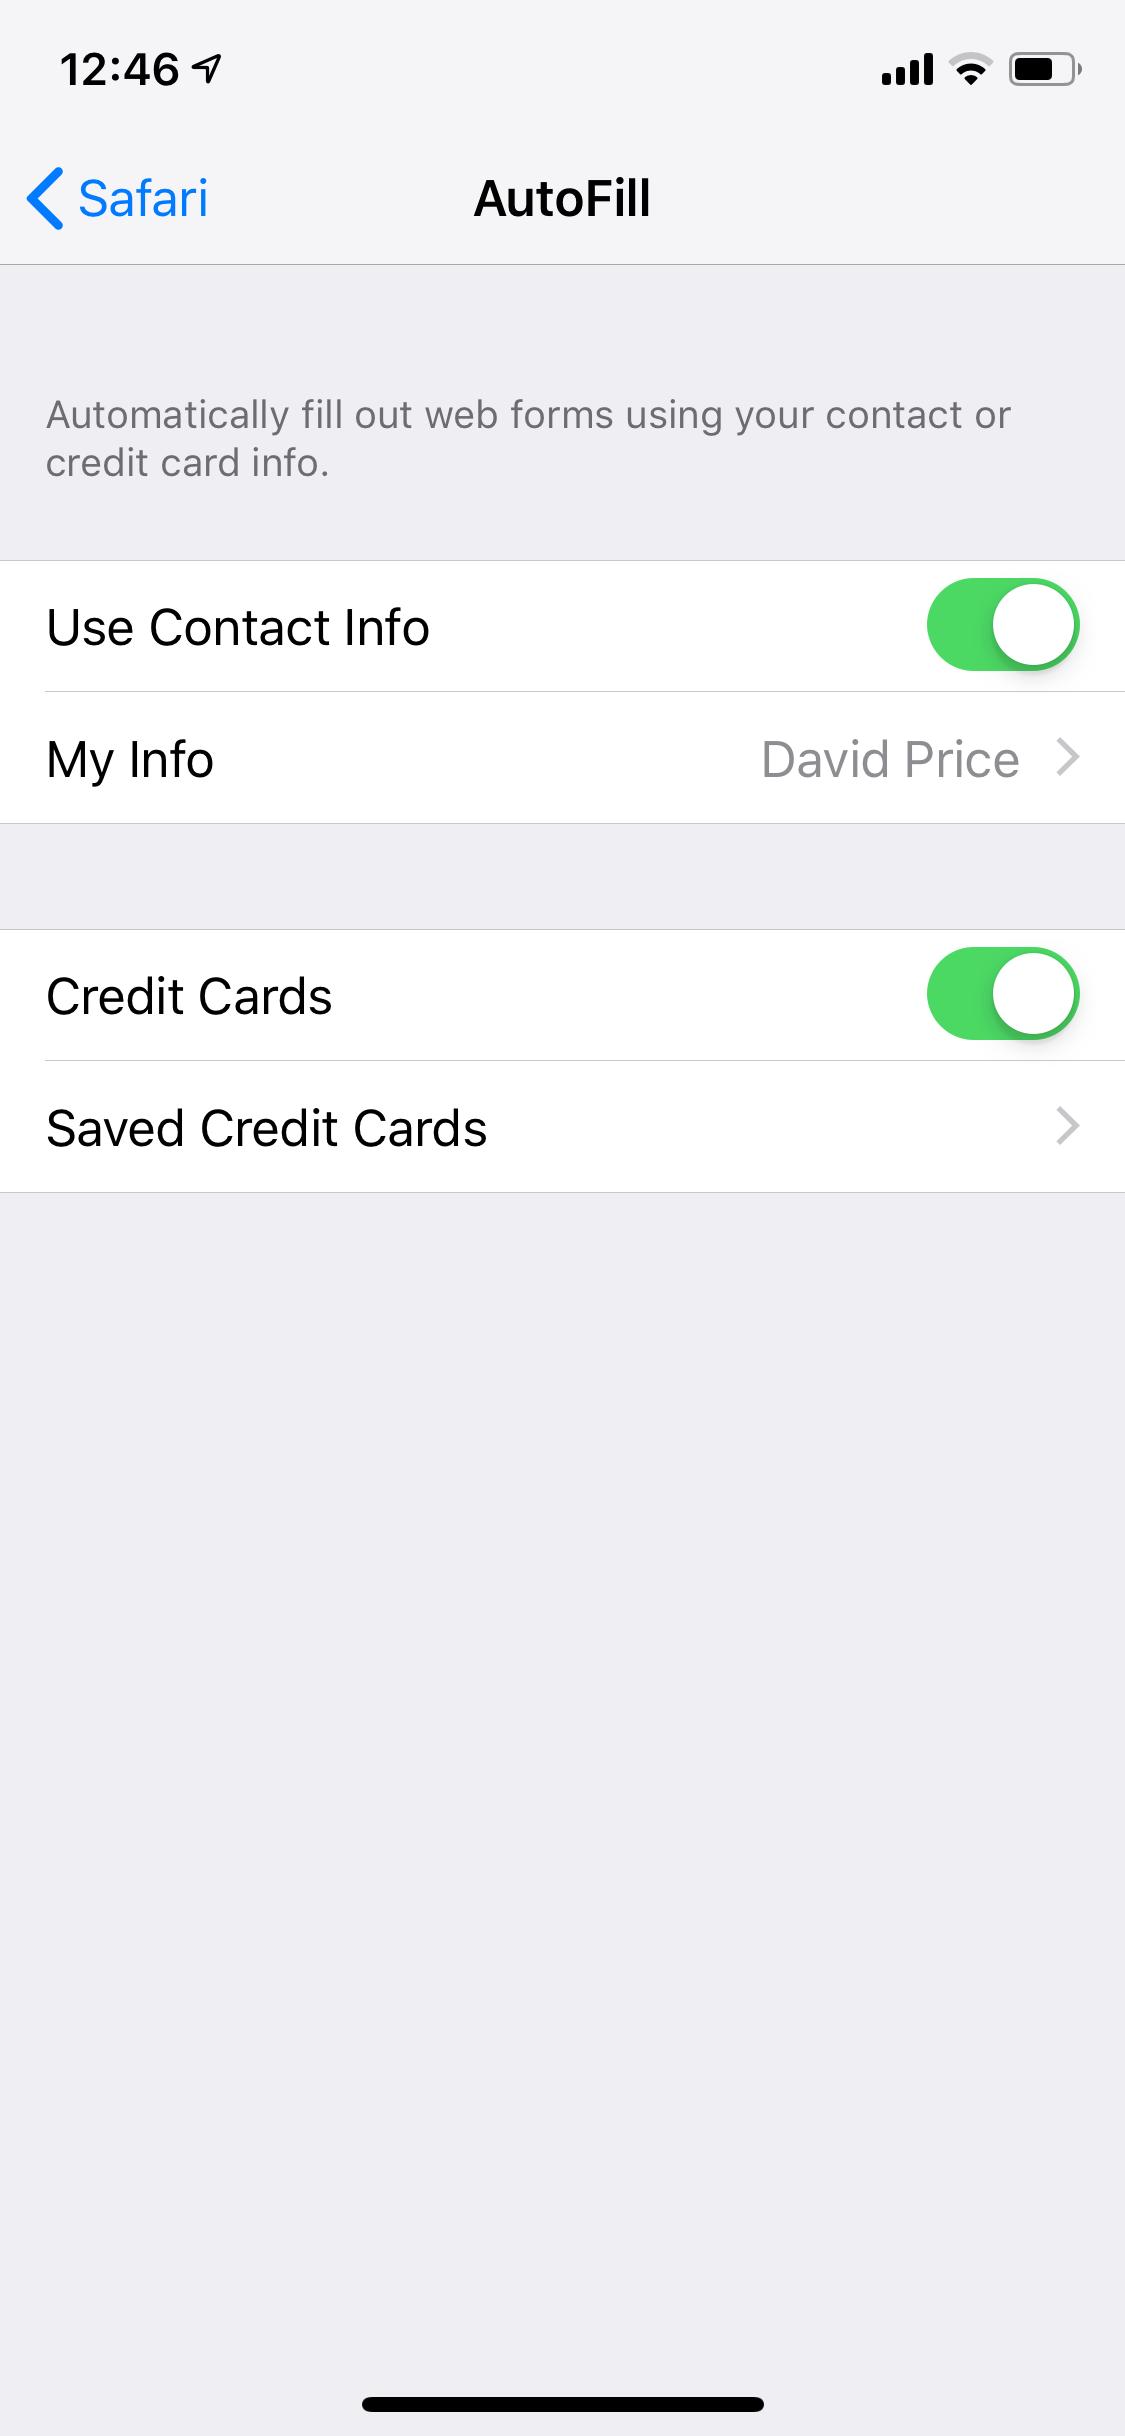
The same can be said about Apple’s auto-fill feature in Safari. Apple’s Keychain stores website logins, prompting users to save the information after successfully logging into their account.
It’s a hugely handy feature as it means we don’t have to remember the login information for the myriad of websites we browse – and the same goes for credit/debit card information. Simply tap a button and Apple will fill out all your card information, apart from your security code.
However, if a hacker does manage to gain access to your iPhone, it provides them with access to all your online logins. To disable keychain and auto-fill, simply go to Settings > Safari > AutoFill and toggle off each option.
Author: Lewis Painter, Senior Staff Writer

Lewis Painter is a Senior Staff Writer at Tech Advisor. Our resident Apple expert, Lewis covers everything from iPhone to AirPods, plus a range of smartphones, tablets, laptops and gaming hardware. You'll also find him on the Tech Advisor YouTube channel.