If you’ve just prepared yourself for an important Zoom meeting or have been looking forward to catching up with friends online, only to discover that the webcam on your Mac suddenly isn’t working, the most obvious response is to tear your clothes while screaming at the sun about the futility of it all. But before you berate the old gods, here are a few solutions you can try to get the camera working once more.
Check it isn’t being used by a different app
If you’re planning to use FaceTime but Zoom is still running in the background, it could be that the latter still has control over the camera. Try shutting down any apps that use the camera and see if that helps. You may also have to reboot the app you want to use, so it can detect that the camera is now free.
Update your software
Little bugs sometimes crop up in software, so it’s a good idea to make sure you’re running the latest versions of macOS and the app you’re using. For macOS, click on the Apple logo in the top left of the screen then select System Settings. Select General from the list on the lefthand side of the new window, then click Software Update.
For apps, you’ll need to open the App Store and select the Updates option from the list in the left column.
Is Screen Time blocking access to the Mac webcam?
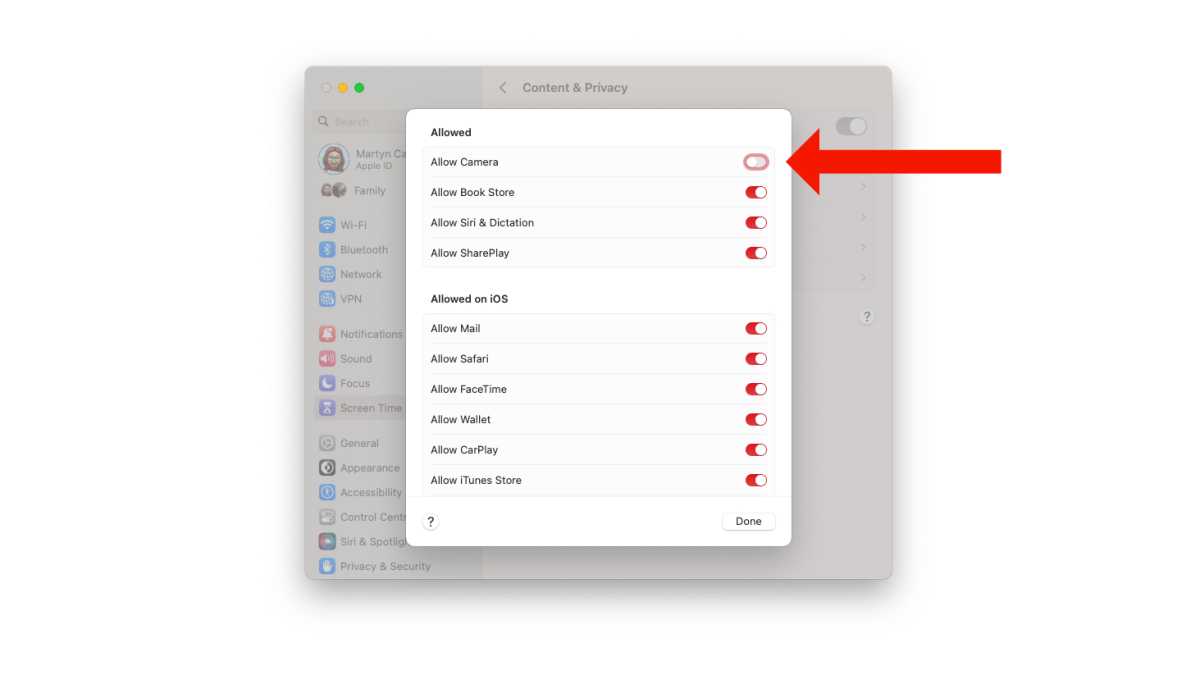
Another simple thing that can cause the camera on a Mac to appear unresponsive is if you have Screen Time set up and have not given an app permission to use the camera.
This is an easy fix as you just need to go into System Settings (or System Preferences, depending on which version of macOS you’re using) and select the Screen Time option from the column on the left.
If you have the feature enabled, select Content & Privacy > App Restrictions and check that the Camera option is toggled on.

Martyn Casserly
Does the app you’re using have permission to use the camera?
In a similar vein, if you’re running macOS Mojave or later, you may have the camera permissions for certain apps switched off. To check, go to System Settings > Privacy & Security > Camera and make sure the relevant app is allowed to use the camera.
Reboot your Mac
Sometimes, computers can get a little confused. In these instances, turning the Mac off and rebooting it can actually solve quite a few common problems. So if the camera isn’t working after you’ve tried everything above, give it a quick reboot and you might find things magically start behaving.
Reset your Mac’s SMC
A Mac’s System Management Controller does pretty much what its name suggests. Occasionally this can be corrupted or just get a little out of sorts, requiring a quick reset to get things back on track. We have a guide on how to reset the SMC on a Mac, so give that a go and see if anything improves.
Macs equipped with Apple silicon chips (M1 or later) don’t have an SMC that you can reset. But you can try shutting them down for at least 30 seconds and then powering them up once more. It might work, although this method is more anecdotal than official.
Check the hardware
When your Mac’s webcam is powered on you should see a little green light come on next to the lens. If this isn’t happening then it could signal a problem with the hardware itself. If that’s the case, you’ll need to take a trip to the Apple Store to get it looked at. If you’re not sure what to do, we have a simple guide on how to book an appointment at an Apple Store’s Genius Bar.


